

Shanghai company Raise3D Technologies has introduced a modern 3D printer with two extruders, an enclosed camera, and a stylish design. The possibilities of the device are limited only by its technical characteristics and the owner’s imagination: it can be used both in production conditions, at home and in educational institutions.
The key feature of the printer is the ability to print 2 products at once, which saves printing time significantly.
Overview of the Raise3D E2 3D printer

Global 3D printer manufacturer Raise3D announced the Raise3D E2 in September 2019. It was presented as a new multipurpose, easy-to-use industrial device that will be the starting point for an entire line of E2 series printers for various industries.
Features of the printer that the manufacturer is talking about:
- RaiseCloud ecosystem;
- Compatibility with any consumables (filament) participating in the Open Filament program.
TIP! RaiseCloud is the first fully integrated 3D printing management ecosystem of its kind.
Raise3D E2 3D printer Technical Specifications
Operating temperature: 5-35 ºC
Dimensions, mm: 607x596x465
Housing material: Aluminum
IdeaMaker software
Calibration of the tabletop auto
FDM printing
Supported file formats STL, OBJ, GCODE
Heated platform yes
Temperature of printing table up to 110 ℃
Area of the working chamber 330h240h240 mm
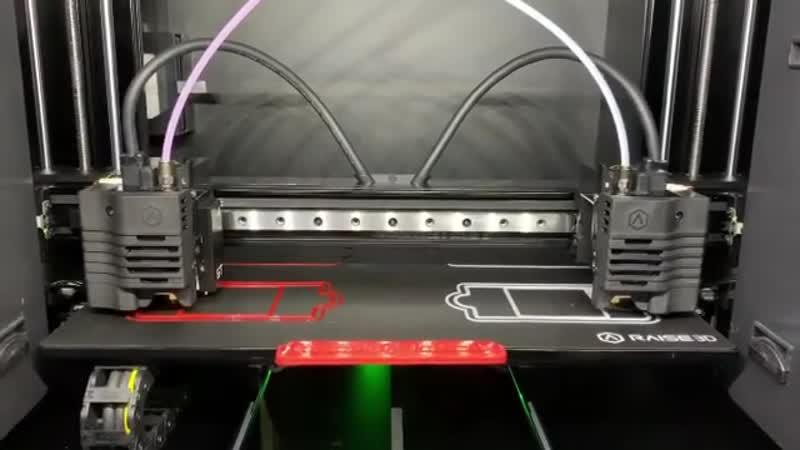
Number of print heads 2
Materials used: PLA, ABS, HIPS, PC, TPU, TPE, NYLON, PETG, ASA, PP, PVA, Glass Fiber Infused, Carbon Fiber, with metal particles/wood particles
Thickness of layer from 10 microns
Filament diameter 1.75
Nozzle diameter, mm 0.4 mm (0.2/ 0.6/ 0.8/ 1.0 mm optional)
Screen 7″ touch screen, 1024×600
Interfaces Wi-Fi, LAN, USB
Extruder temperature 300 ºC
Maximum positioning accuracy XY: 0.78125 µm, Z: 0.078125 µm
Positioning speed 30 – 150 mm/sec.
The device can operate in 3 modes:
- standard – printing one model or two, independent of each other;
- duplication – synchronous printing of two identical models;
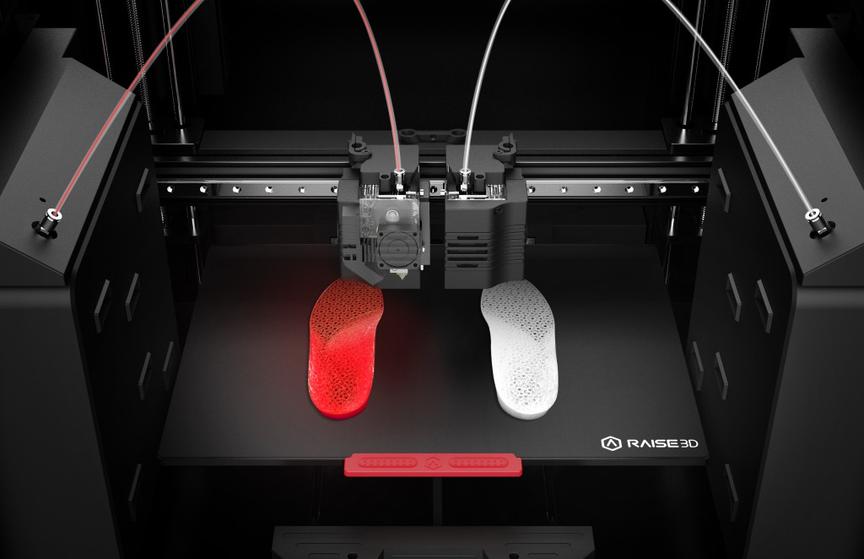
- Mirror – printing of two mirrored models (relevant, for example, in shoe manufacturing).
The printer has a relatively small weight and dimensions for an industrial device, so it can be placed both on the floor and used as a desktop 3D-system. Externally, it looks like a large microwave with a stylish, eye-catching black metal body with red details.
It is a closed-type 3D device with a cast steel body and aluminum frame. The front of the device is made of carbon fiber.
At the front there is a hinged door with a large porthole – a viewing window of the working area, through which you can see the platform and the 2 working elements (extruders). Above it is a 7-inch touch screen display, with which you can monitor the entire printing process. Also for convenience, you can install an online video camera, broadcasting from which allows you to watch the process, even remotely.
The printer is equipped with a flexible platform with Buildtak coating. It promotes the best possible grip on the plastic and easy, fast separation of finished products from the platform when printing is complete. A built-in ABL (Auto Bed Leveling) system ensures automatic platform leveling, and constantly monitors the distance between the platform and nozzles. This feature allows printheads to quickly adapt to changes in surface topography without the use of rafts.

The device has a good safety system. For example, if the door or top cover is opened or in case of power problems, printing automatically stops and resumes from where it stopped.

If the filament runs out during printing, the light sensor lights up and printing pauses. You can replace the filament immediately, then press the power button and continue printing.
The noise level is 50 dB. The filtration system uses a state-of-the-art HEPA filter for silent air purification.
At the top of the printer, above the main door, there is a 7-inch color touch screen display. It allows you to fully control the printing process, manage all the settings (webcam, Wi-Fi connection, printing parameters). For this purpose the device is equipped with its own software – IdeaMaker.
IdeaMaker is developed by Raise3D and is distinguished by the presence of its own cloud RaiseCloud. The software is supported on Windows, Linux and iOS and is compatible with STL, OBJ and 3MF files. You can also control multiple devices in the cloud from a single gadget.
You can also open a section with tips and tricks, see instructions for setting up the printer, and even select a model from the catalog.
When printing at night or to save power consumption, you can press a special power-saving button. This turns off the touch screen display and the LED lighting.
TIP! The smart key, or power-saving button, is located at the front of the device to the right of the control display.
Thus, Raise3D E2 has a high performance, reproduces precise models of different filament types up to 30 cm in size, requires little maintenance and is well suited for amateur and professional printing.
Key Features
Highlights of the Raise3D E2 include:
- 330 × 240 × 240 mm printing volume;
- 2 independent extruders that can do duplicate and reverse printing;
- Compatibility with various types of filament from different manufacturers;
- Ability to print with different laminates in different extruders;
- precision positioning 0.78 µm in X/Y axis, 0.15 µm in Z axis;
- large touch screen display for monitoring the printing process;
- New generation print re-start system;
- Maximum size of the product – 30 cm;
- automatic platform calibration;
- Power Saving Mode;
- high printing quality with low consumption of filament;
- easy and convenient setup and use.
Accessories
The package includes:
- 3D-printer;
- power cable (5 pcs.);
- spool holder (4 pcs.);
- tweezers;
- 2 flag fuses;
- 2 PTFE guide tubes;
- hexagon set;
- sharp spatula for removing the finished items from the platform;
- USB flash drive;
- 2 reels of Raise3D Premium filament (white and red);
- plastic rivets (4 pcs.);
- Heat-resistant gloves made of thick felt;
- nozzle cleaning kit;
- 4 plastic storage boxes;
- 4 feeler gauges 0.3 mm;
- 2 plug connectors.
Print quality and sample products
High print quality and productivity are the key features of the Raise3D E2.

The special structure of the platform ensures good adhesion of the first layer and a rapid separation of the finished model from the platform. This maintains the original shape and smoothness of the surface.


Auto platform calibration and RaiseTouch make for easy post-processing: no sanding or correction required. Just varnish or paint them or leave them untouched.

If necessary, the given printing parameters can be corrected during the printing process.

Who is suitable for whom?
The printer is intended for professional use: for creating training models and prototypes, for small-scale production of small items, for the production of models for educational institutions (e.g., designers, anatomical structures).

The device is also suitable for professional training of production and technical personnel and for creating auxiliary products in medical and other fields: personal protective equipment for doctors, valves for ventilators, adapters for diving masks and other small parts.

With two independent extruders, you can print two-color, mirror or identical products. In addition, the printer can also handle the printing of models with soluble plastic supports.
Having two printing areas doubles the number of items printed per class in educational institutions, increases productivity in identical and bulk orders for manufacturing workshops, for 3D printing studios cuts batch production time in half, and for 3D printer farms increases the productivity of a single equipment cell without expanding its footprint.
What materials are used?
The printer is versatile in combination with filaments from various manufacturers with melting points up to 300 degrees. Accordingly, only refractory filaments are an exception.
However, with other materials there will be no problems. The model is compatible with nylon, PLA, ABS, HIPS, PC, TPU, TPE, PETG, ASA, PP, PVA, as well as glass, carbon, filaments with metal and wood particles.
Regardless of which material is selected for printing, the filament feed sensor will indicate if filament needs to be added.
Raise3D assures that the E2 will be the beginning of a line of premium professional printers, which will include devices for refractory and composite materials.
Instructions for Initial Setup and Preparation
The printer is shipped preassembled in a cardboard box, secured to a wooden pallet with zip ties.
After removing the printer from the box, place it on a flat, stable surface. Next, remove the other parts of the printer, which are protected by the foam, from the operating area of the printer. To do this, open the front door and carefully remove the box with the kit by loosening the retainer screws.
The axes are held in place by two types of retainers on the right and left sides. They are fastened by handy, large screws with a ribbed surface that can be loosened even by hand without tools.
After loosening the screws, it is necessary to check that the printer is working. To do this, plug in the power cord and press the power button: the LEDs should light up, the touchscreen display should turn on, and the fan should start to run.
The first thing the control display will ask you to choose the interface language. Among all other languages there is also Russian, so there should be no problems with setting up the printer. The first time you turn it on, after selecting the language, a welcome guide to preparing and setting up the device will be automatically loaded.
After the printer automatically lifts the Z-axis up to the stops, you can remove the parts kit from the inside. This is what the first video in the instructions will be about once the unit is turned on.
The next step is to choose a device name. It has to be made up and entered using the touch keyboard. By this name, the printer will be identified in the Network.
Then it is required to select the desired type of connection (Ethernet or Wi-Fi) and wait until the printer setup is completed. All calibrations are performed by the device itself and automatically, so you do not need to take any action at this stage. After completing the adjustment, the printer will offer to print a test model, and based on the results of the work you can decide whether you need to make manual adjustments.
Before trying to print, the filament spools should be installed. The material compartments are located on the sides of the device behind small hinged doors. You need to open them, remove the rubber plugs and install the reel holders and then the filament.
Next, if necessary, you need to adjust the printing parameters in the “Utilities” section of the display. The correction system is semiautomatic, i.e. you can go to the video instruction with one click and set the characteristics according to the instructions in it.
TIP! For test printing you can set the settings automatically by clicking on the “Quick Setup” button.
After setting up and calibrating the two independent print blocks, press the “Print” button and select the model source: USB stick, library or external storage (RaiseCloud).
Model selection is followed by sending to print and waiting for the finished model. You can watch the printing process in the front or top window or via a webcam, but you have to connect it in advance in the corresponding section of the menu.
The finished product is easily removed from the platform with the help of the sharp spatula that is included. The platform itself is also easy to remove and requires no special care.
In summary, the Raise3D E2 is a modern and innovative 3D printer with two independent extruders, a large touch screen and good technical features. This makes the printer fast, accurate, high-quality printing and can be used in a wide range of professional applications.


