
Once you’ve created a part on your 3D printer, you should let it cool down and then separate it from the building plate. Sometimes, the part might get stuck to the platform if there is too much first-layer adhesion. You’ll be highly likely to face this problem if you use PETG for your prints. However, with other materials, this can happen as well. When removing the part from the plate, you should be careful to not damage both. In this article, we’ll describe nine simple and efficient methods of getting the prints off the printer’s platform. You can try to use all of them to find out which one works best for you. Some of these methods are 100% free, others require very little expense (such as buying a spatula or high-gauge soldering wire). Only one method might be a bit costly — but the investment should pay off very quickly.
- Method #1: Apply Brute Force
- Method #2: With a Flat Blade
- Method #3: Replace Your Build Platform
- Method #4: Enable a Raft
- Method #5: Add to the Build Platform
- Method #6: Create a Temperature Difference
- Method #7: Floss It Off
- Method #8: Run the Plate and the Part Under Cool Water
- Method #9: Add a Solvent
- Final Thoughts
Method #1: Apply Brute Force
To remove the prints off the build plate, you can try to pull or push them. Hold the build plate in place with one hand and pull or push the print with the other one. If there’s an area of the print where a gap exists between the build plate and the object, you can try to insert a strong object there to pry the part off the bed.
This method should work for strong prints. You should probably avoid applying it to prints with many small features, especially if there’s no smooth, easy surface to grip — these might get easily damaged in the process. Besides, you should be careful because a sudden release from the bed might cause you to slam your hand into a wall or some other obstacle.

Method #2: With a Flat Blade
This seems to be the most common way of removing prints off the bed. You should find a flat, sharp blade, like a spatula. In offline and online shops, such tools are available in a wide variety of sizes and shapes. If you don’t have one and don’t want to buy it, you can try the following alternatives:
- Paint scraper
- Large flathead screwdriver
- BuildTak spatula
- Plastic razor blade
- Filling knife
When using one of these tools, you should be careful not to scratch the print surface. Scratches on the surface might affect the adhesion of future prints and it might be difficult to level the bed.
And of course, you shouldn’t forget about safety. When acting in a haste, you might have parts dislodge from the bed abruptly or cut yourself. Safety rule number one is: always push the blade away from you.

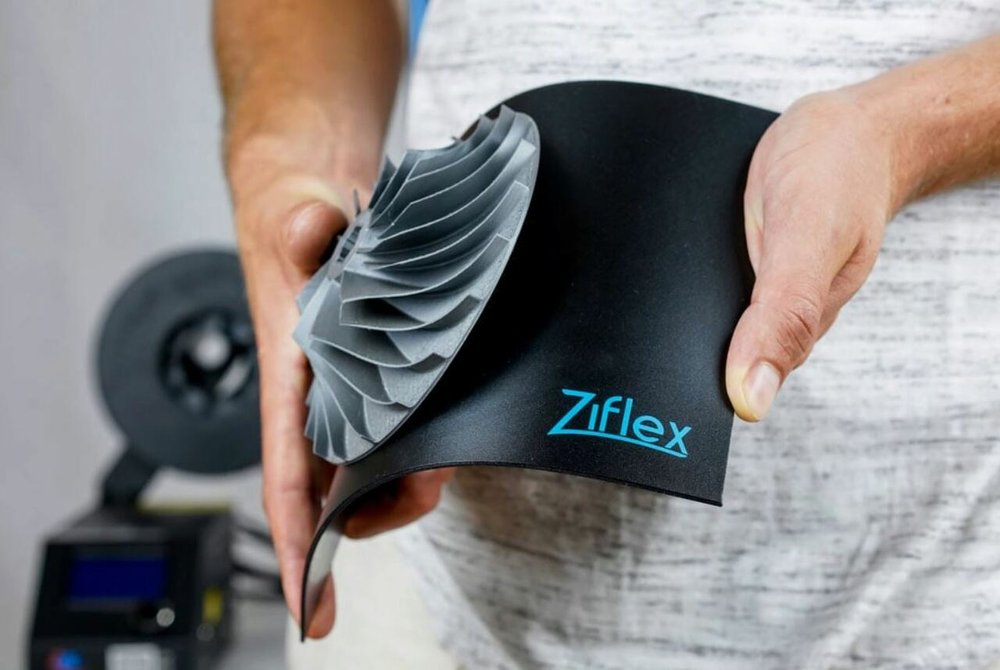
Method #3: Replace Your Build Platform
In the introductory passage, we said that only one method from this article will involve more or less considerable expenses — so this is it! After you install a flexible build plate on your 3D printer, you’ll be able to bend it to pop off a print. Here are just a few examples of excellent platforms that you might consider:
- Adafruit Flexible Plate
- BuildTak FlexPlate
- Easy-Peelzy
- Prusa Spring Steel Smooth PEI Plate
- Ziflex
Please mind that it is not a rating and the platforms were listed in alphabetical order. This is how you should use a flexible plate:
- Secure it to your 3D printer
- Level the bed
- Set the Z offset
- Start to print
- Once the print is complete, detach the build plate
- Bend the plate gently until the part pops off
Plates can bend in multiple directions. The most important parameter for choosing an ideal platform is its dimensions. You need to make sure it fits your machine. A plate that is too thick might block the inductive sensor.
Obviously, glass can’t bend. So when choosing a flexible built plate, you might want to opt for the one made of metal or some other material. You can try to experiment with various smooth or textured surfaces to detect the one that suits you best. Also, you should find out which adhesive finishes are optimal for your 3D printer and materials.
Method #4: Enable a Raft
The raft will serve as a buffer layer that will help you to separate the print from the build plate. You should enable a raft in the 3D slicer when preparing a model for printing. The raft should allow you to achieve the following goals:
- Improve bed adhesion
- Set buffer layers between the print and the build plate
- Make it easier to remove parts
- Reduce the chance of the part being warped
Rafts are disposable so you shouldn’t worry about damaging them. Most slicers enable you to modify the settings of your raft, such as the number of top layers. Once the part is printed, you can choose between two variants:
- Remove the part from the raft
- Remove the raft from the build plate
The second option is usually easier than the first. We won’t share any instructions on removing the raft from the plate because you can do it in any way you wish. You can remove it using any method from this article. Just be careful and don’t touch the part itself to not damage it accidentally.
The primary disadvantage of the raft consists in the fact that it increases the printing time and filament consumed.

Method #5: Add to the Build Platform
This method is similar to using a raft but you won’t need to spend filament on building a buffer layer on the plate. To separate the part from the printing surface, you might want to use the following additives:
- Painter’s tape
- Peelable PEI sheets
- Regular glue sticks
Here is what exactly you should do:
- Stick or apply the buffer layer
- Recalibrate your Z offset to account for the increase in build plate height
- Start the print
- Once the printing process is over, remove the part from the buffer layer or remove the entire buffer layer
If you use glue, you can run the plate under water to remove the glue layer and help the part fall off.

Method #6: Create a Temperature Difference
When materials get colder, they contract. Thanks to the different cooling rates of the print bed and the printed part, it should be easy for you to remove the part.
To use this method, you should follow five simple steps:
- Let the 3D printer and the print cool down to room temperature
- Place the build with the stuck part in a fridge or freezer or on top of a vent spewing cold air
- Wait for a few minutes until the bed gets moderately cold
- Try to remove the part
- If the part fails to pop off, try putting the build plate back in the cold environment for longer or use another method
The more temperature-sensitive the material your build plate is made of, the better. Aluminum and glass, for instance, are very sensitive to differences in temperature.

Method #7: Floss It Off
To remove a 3D print from the bed, you can use the regular dental floss from your bathroom. If you lack the floss or it fails to help, you might want to replace it with jewelry wire, high-gauge soldering wire or other strong string-like products. Even though this method might seem a bit unconventional, it’s highly efficient and rather easy. This is how it works:
- Loop the floss or wire around the base of your print
- Once the wire or floss is lying on the build plate, you should rapidly move it back and forth, pulling it at the same time towards you
- The part will eventually give way and dislodge from the build plate
Basically, you should use the same movement that you repeat every morning and evening when cleaning your teeth. You should move the floss or wire back and forth repeatedly like a saw. This back-and-forth motion will produce friction that should enable you to remove the part.

Method #8: Run the Plate and the Part Under Cool Water
Find a steady flow of cool or cold water and place the plate and the part there. This is a very simple method that relies on the same principle as putting the plate in the fridge. You’ll benefit from an intentional temperature difference between the materials.
To separate the stuck part from the platform, you should follow these steps:
- Wait until the 3D printer and the part have cooled down to room temperature
- Remove the build plate and place it in a sink
- If you used glue, hairspray or a similar adhesive, first run some warm (but not too hot!) water on the base of the print to remove some of the adhesive substance
- Run moderately cool or cold water on the build plate for a few minutes
- Try to avoid getting the print wet because this method delivers the best results when only the print bed or the printed part is cooled
- Running water will go on removing any remaining adhesive
- After a few minutes, try to remove the part again with your hands or use a praying tool like a spatula
In case you fail to achieve the desired result, you might leave the plate under colder water for a longer time or try a different method.

Method #9: Add a Solvent
This method occupies the last position in our list because you should resort to it only when there are no other alternatives. Solvents might ruin print surfaces. You should never apply them to PEI sheets, painter’s tape or similar surfaces.
The two types of solvents that are best compatible with 3D prints are isopropyl alcohol (IPA) and acetone. This is how you should use them:
- Apply the solvent on your print’s base where it touches the bed
- Let it soften the affected area
- Slip a prying tool under the print
- Remove the print from the bed
Just a few drops of solvent should be enough. You should put them only on the connection points between the bed and the print. If you use too much liquid, the build surface might degrade.

Final Thoughts
Hopefully, you found this article informative and now you better understand how to remove a 3D print that got stuck to the bed of your 3D printer. Even if you have little experience in 3D printing, you should be able to learn quickly. To make the part get off the plate, you might want to apply brute force, add a solvent, use a flat blade or floss the part of the bed using your regular dental floss. You can enable a raft, add to the build platform or replace the default platform with a flexible one. You may benefit from the temperature difference or run the build plate under cool water. Choose the method that suits you best, practice for some time and learn how to remove your prints quickly, safely and with minimum effort!


